
If your repeat purchase rate is under 40% (which is normal in Ecommerce), that means you're continually forced to replace 60% of your customers! Every single year!
This can lead to high (even unsustainable) customer acquisition costs (CAC) over time, which is why it's so critical push up your repeat purchase rate.
Even a 1% increase in your repeat buyer rate over time will have a huge effect on your business economics and make it easier to grow.
One of the tools at your disposal - which adds no additional direct cash expenses - is to set up an email campaign to your New Customers who haven't bought in a while to try to close at least some of them on a discounted 2nd purchase.
This is an automatic campaign that will always be running in the background and closing sales on some of your "Churn Risk" new customers to push up your repeat purchase rate.
In my last article I went over how to segment New Customers in their journey in order to better segment them for getting a 2nd purchase. I broke them out into 4 buckets:
- Active - Your New Customers who are anywhere from waiting for their order to come in the mail to putting their first purchase to use (I wrote an article about this email series here)
- Drifting - Your New Customers who are drifting outside of the normal range of making a 2nd purchase
- Churn Risk (this is the campaign group we're focusing on here) - At this point, customers are way past their optimum repurchase timeframe and they have not responded to the previous engagement tactics
- Lost - Your New Customers who have far, far past the normal range of making a 2nd purchase and are functionally "Lost" to your business.
This is a shorter discussion on a broader Ecommerce Customer Segmentation topic. Now though we'll set up an automatic email campaign to "Churn Risk" New Customers to close the second sale.
We call this a "Winback" campaign, in an effort to win back customers who will otherwise be lost to your business without your intervention.
"Winback" Campaign Outline
A "Winback" campaign will typically close repeat sales on 1-2% of your customer base (I've seen it as high as 4%) which will give you a healthy continual sales boost that will raise your repeat order rate.
You will need to:
- Identify Your Customer Target
- Craft a Discount Offer you're comfortable with
- Build 2-3 Reminder Emails you can automatically send out
- Set Up Automation around "Last Order Date" within your email platform (in this case, HubSpot)
Step #1: Who Am I Targeting?
Let's first paint a picture of the customers we're targeting. First, make an estimate of how often your customers repeat purchase.
It's possible to be super math-savvy about this, but without getting into complicated Excel analysis of your customer base, just launch a first version based on your gut instincts of your customer needs.
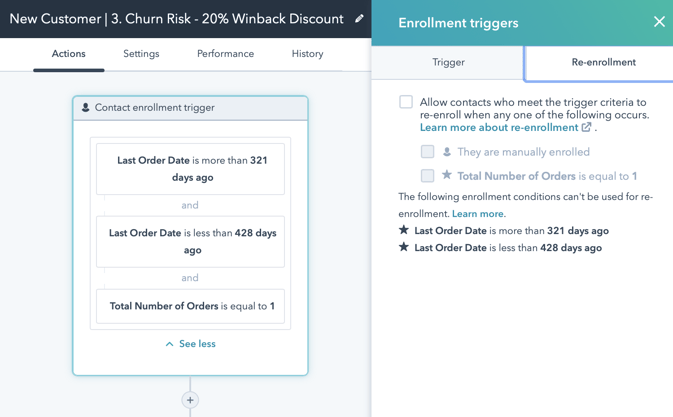
Let's say, for sake of example your "Average Days Between Orders" is 107 days.
Your "Churn Risk" New Customers will be those who haven't bought between 3-4 times that "Average Days Between Orders". In this "107 days" example, that's 321-428 days since their first order.
If their first order was MORE than 428 days ago, we're considering them a "Lost" new customer, so you're going to launch this email series to customers who are in the previous "Churn Risk" stage.
I cover more of these "Recency Rating" concepts in this New Customer Segmentation article. Again, the general idea is to target these "Churn Risk" customers who have past their optimum repurchase timeframe and they have not responded to the previous engagement tactics.
Step #2: How Much Do I Discount?
You can do an optimized analysis in later versions, but for launching something this week just do a gut check and ask yourself, "If I'll otherwise lose this new customer forever, what's the most I'm willing to spend to secure a repeat purchase that would still be profitable to my business?"
I've written an article on coupon strategies for abandoned carts which would also apply to New Customer Winback coupons.
Don't get caught in a "sunk cost fallacy" trap and think you need to discount too much to cover the ad and marketing dollars you've already spent to keep these New Customers. That's why I'd stick to just asking that question above and identifying a discount that will still allow the 2nd purchase to be profitable on its own. In this case a low-profit margin is still enough, for the sake of a 2nd sale.
For reference, anywhere between 15-30% off is common "Winback" range I see for increasing the 2nd sale rate. You'll have to decide what your business can still afford per order.
Although we offer a personalized one-time coupon generator for HubSpot, this is currently only available to Enterprise clients.
To make implementation simpler we recommend just creating a fixed coupon code within your shopping cart for a % or dollar-amount off that you simply swap out and expire every few weeks or months - depending on your store volume - in order to keep the coupon off of Honey App and RetailMeNot.
At the very least, make the coupon code APPEAR generated with a name like like "30OFF-K4F5" or random characters to that effect.
(But if you DO have HubSpot Marketing Enterprise, here's our Knowledge Base article for setting up the personalized one-time use coupon generator. It'll require our Growth subscription level, and you'll create 2 contact workflows: one that sends the webhook to generate the coupon in your cart and the 2nd workflow that delivers the actual emails with the coupon merged in.)
Step #3: What Emails Do I Make?
With any coupon/discount offer I always recommend a 3-email followup structure:
- Email 1: Announce the discount
- Email 2: Remind the discount (and introduce the expiration date, if it's automatically generated)
- Email 3: Final discount reminder (the day of or day before the expiration date, if it's auto-generated)
If you're able to generate one-time use coupons (as discussed in the previous section) then I would make the coupon expire in 14 days (2 weeks) with the emails being delivered during that time range.
If you're not able to implement generated coupons then you will not be able to mention a coupon's expiration date. The nice thing about having an expiration date is that it offers you three opportunities to communicate something new about the offer (announcement, expiration announcement, then final reminder before expiration) and therefore won't come off as repetitive.
When you DON'T have expiration date at your disposal, I might propose this alternate 2-email structure:
- Email 1: Announce the discount
- Email 2: Final reminder of the discount (never stating it's expiring - since you can't dynamically expire the coupon on a per-customer basis - but letting the statement that it's a "final reminder" imply some form of expiration)
Obviously, it's better to have 3 emails to give yourself three possible touch points, but without dynamic expiration then 3 emails will be repetitive unless you can find another on-brand way to have 3 communication points.
It's been a while since they've bought from you, or even thought of you! You need your entire offer to mentally AND emotionally register within 2 seconds of looking at your email.
Here's some copy and design points to get that <2 second engagement:
- Subject Line: Common subject lines are "We Miss You!" or "Final Reminder" (you need something provoking to get the open of the email, because although email spam filters are getting more sophisticated phrases like "discount" or "20% off" in the subject line can land more of your emails into spam)
- One Large Clickable Image: Convey the entire offer copy within a clickable image at the top of the email, which shows completely above the fold and will also clearly show all text scaled down on mobile (where 48% of emails get opened):
- Lifestyle Product Shot: The background/base of the image should be a lifestyle shot showing people using your product, if possible, or at least emotionally evoking the benefits that you want users of your product to feel. Using images of people to establish an emotional connection is one of the major components of this campaign.
- (optional) 1-2 Embedded Product Images: If the lifestyle shot of people can't actually show your product in the shot or feels like it's missing something, you could also add actual product shots to the image
- Big Text Stating the Discount: State "Come Back With 30% Off!" or something to that effect in the image. Put the coupon code right below this in big font.
- CTA "Buy Now" Button: At the bottom of the image, below the coupon code text, put something that looks like a button within the image stating "Buy Now" or "Shop Now" so that it's clear the entire image is clickable
- Coupon Code Text (as actual text): In order to make it easy to copy the code, I actually recommend vertically "splitting" your image in the middle where your coupon code would go - almost like a single-color banner through the image - that displays the coupon code in large text. So you actually have two images - one on top, a text coupon code in the middle, and the 2nd image at the bottom. From a design standpoint all 3 elements together look like a single image, while making it easy to copy the actual coupon text. (if you're not using a generated code you can put the text into the actual image for more flexible design)
- Link to Your Products Page: Don't link to your site's home page, but the actual products page so they can buy immediately (if you have any Categories Bought segmentation available like men's/women's or particular supplement categories, for example, then you can have additional segmentation in later version that appeals to and links to these specific category pages)
- (optional) Apply Coupon Code in the Link Click: I say this is optional because it's hard to do, but if you can apply the coupon with an email link click then that's one less step for closing a sale, and you can clearly communicate this in the CTA with text like "Apply 30% Coupon & Shop Now". It's relatively easy to do this with Shopify, but the other carts we integrate with (Magento 2, BigCommerce, and WooCommerce) all require a combination of custom plugins and Javascript.
- Repeat the Image Text in Body Copy: Also put the same copy within the email image in as actual text inside the email, including the coupon code text with a clickable CTA button below (Emails are usually considered spam if they're mostly an image and have no text, so make sure the text within the image is also represented as text in the email)
- Product Grid at the Bottom: Include a product grid of at least 4 products they can click on (ideally the products that are most commonly bought in a 2nd purchase, which we include as part of our paid Customer Journey Analysis)
- Associate with a HubSpot Campaign: As always, each email needs to be associated with a HubSpot Campaign for proper revenue tracking.
Step #4: How Do I Build the Automation?
Create a blank Contact Workflow with a name like "New Customer | 3. Churn Risk - 20% Winback Discount" or something like that.
Depending on your math from our previous "Targeting" section, set up triggers like this (you don't need to worry about workflow re-enrollment because this workflow should only ever run once):
The Action steps of the workflow would look something like this:
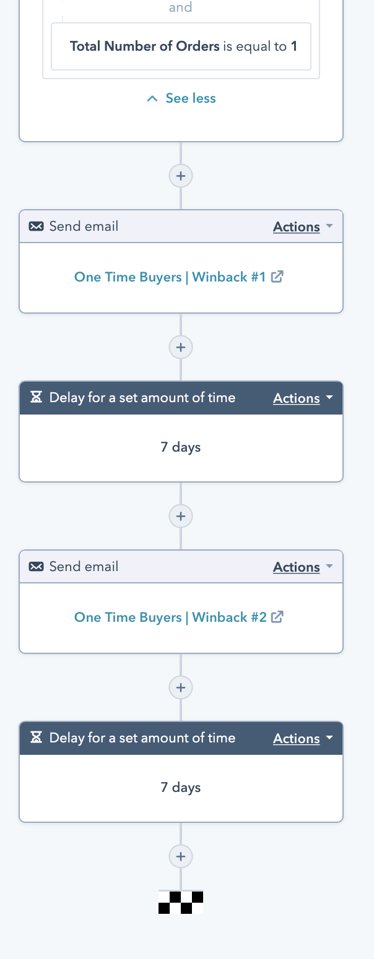
I'll note that the final action is a delay timer rather than an email. This is important because once a contact reaches the checkered flag, they can't count towards a Workflow Goal, so you always want to add another delay after the final email to give the contact time to make that next purchase.
Finally, the Workflow Goal:
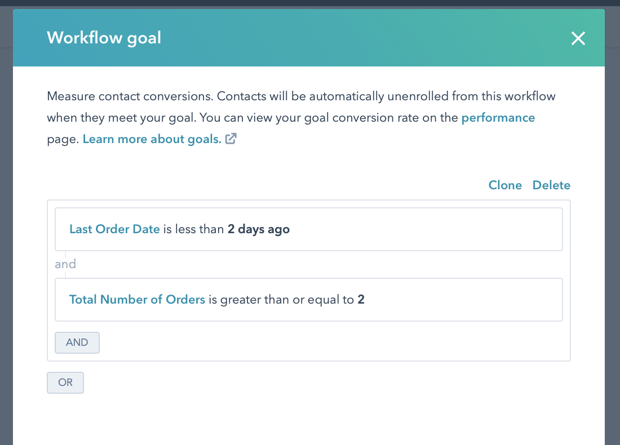
This goal will pull a contact out of getting any additional emails as soon as they place an additional purchase.
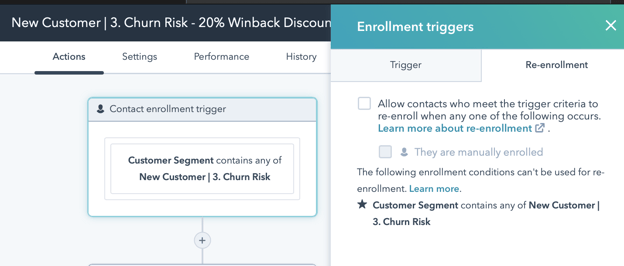
It's a fairly straightforward workflow. And if you've actually implemented the "Customer Segment" from my New Customer segmentation article then your Workflow Trigger would look like this, instead:
Finally, once you've edited and tested all emails and you're ready to turn on the Workflow, I would recommend sending it to ALL contacts who are in this "Churn Risk" segment of 321-428 days since their first order (or whatever your range).
This way you can retroactively send to all contacts in that group and get a jump-start on contacts who will see this content. Click the orange "Review" button in the top right corner and you'll see this menu:
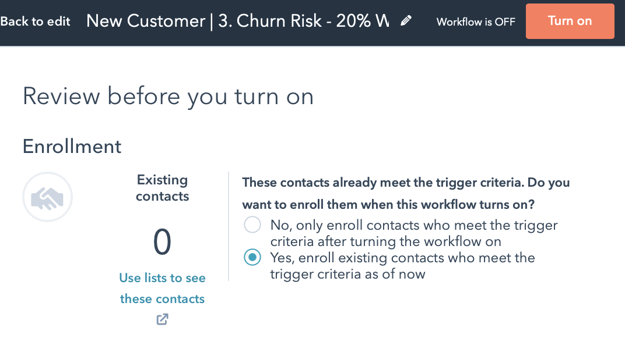
Select "Yes, enroll existing contacts who meet the trigger criteria as of now" before clicking the orange "Turn on" button.
Now notice, if you have 3,000 or whatever contacts in this list, it will send Email 1 to all of those contacts immediately after turning on the workflow!
So before turning the Workflow on:
- Make sure you've thoroughly tested the email
- Make sure there's no errors in your trigger criteria (you can build the Trigger criteria as an Active List to spot-check any issues)
- Make sure that you're turning it on at a good time of the day/week to get Email 1 (sometimes marketers will build these things in the evenings or on the weekend, but these would likely not be a good time for everyone to get Email 1)
Finally, you can select "No" if you're concerned about sending it to a large list and it'll only send the email series to customers who enter this criteria going forward.
If you're able to do the extra testing though, it's very handy to jump-start this Winback campaign with this large list of existing customers to see how it performs. (I don't have time to cover it here, but if you've got a really large list who would qualify for this Winback campaign then you can split up the list of 10,000, for example, into 5 batches of 2000 each so that you have an opportunity to test and make improvements to email copy and design based on the feedback and performance of each batch. If your list is large enough you can run all of the batches over several weeks.)
Increase That Repeat Buyer Rate!
As stated initially, a 40% repeat buyer rate means that you're forced to replace 60% of your customers every single year!
A Winback campaign that can convert 1-2% of your New Customers into repeat buyers will have a huge impact on your monthly sales and customer lifetime value!
Get a Free Customer Journey Analysis!
Identify actionable differences in your Ecommerce customer behavior to focus your marketing efforts. Our subscription eliminates many workflow and report building steps from this article.

