Building a list of Ecommerce leads who aren't yet ready to buy but would still like to get things from you is critical for increasing that 1% sales conversion rate on site visitors. HubSpot's built-in popup tool is powerful enough to win over visitors to a purchase with a great offer.
I'm going to explore a discount popup, because it's easy to implement and applies to a large variety of businesses. As you explore Inbound methodology for ecommerce you will discover other offer types that your leads would sign up for that don't involve a discount (like info PDF's, a video series, a sales demo, or site contests), but content creation on those is a much larger project.
To expand on our Lead Conversion article, this HubSpot project is a relatively simple campaign to implement within a week.
Here's the components:
- Identify Your Traffic Source Target
- Write Your Offer and Coupon Code
- Target Your HubSpot Popup
- Monitor Campaign Performance
- (Later) Launch a Followup Email Series
Identify Your Traffic Source Target
Rather than offer this discount code to everyone, I propose you offer this popup only to the website lead source with the lowest sales conversion rate.
The trouble with launching site-wide coupon popups is that you might be offering a discount to people who were already willing to buy without a discount in the first place.
By choosing a lower-converting lead source of your HubSpot list you can test this coupon campaign without unnecessarily giving away money for your higher-converting sources who were more likely to already buy.
In Part 3 of Ecommerce Reporting I discussed how you can build a variety of HubSpot Reports using Ecommerce data and custom fields.
One of them from that article is "[Ecom Leads Data by Original Source]" which would be great to use here.
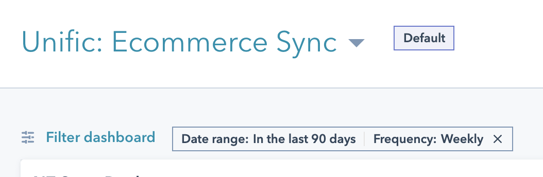
First, take the dashboard you're displaying this report on and Filter it by a "Date Range" of the last 90 days. This will make sure that you're evaluating this targeting using a meaningfully recent date period, and aren't just targeting your "All-Time" data:
In the example below I've sorted by the custom "Lead to Customer Rate" property from Part 3, and I've highlighted the "Organic Search" segment I'd want to target:
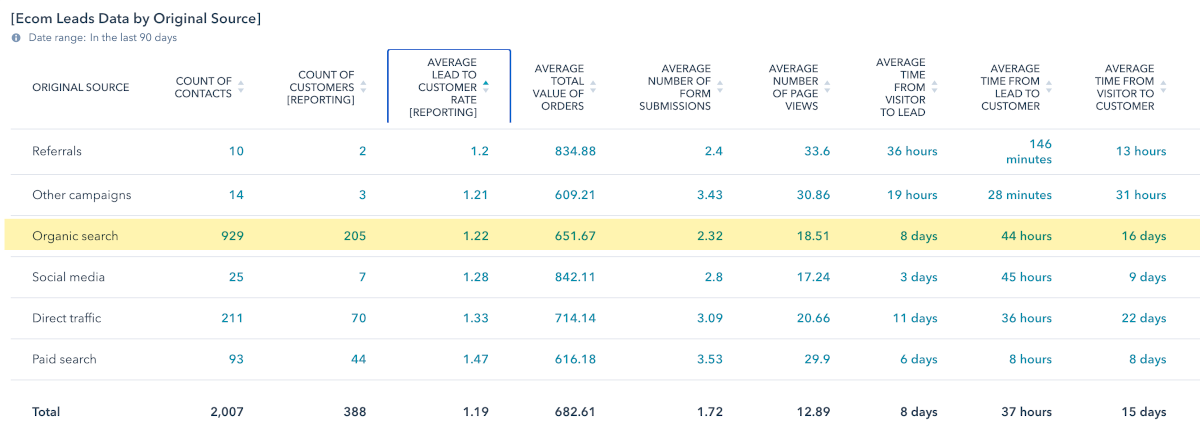
In this example, "Organic Search" has a lead conversion rate of 22% (cut the '1' off of '1.22' to get the percentage because HubSpot custom fields don't allow percentage formatting).
Now, the percentage rate on "Referrals" (20%) and "Other campaigns" (21%) is lower, but because the count of contacts over the last 90 day period is so low (under 25 contacts, combined) it's not meaningful to focus on these groups for this popup coupon ad.
"Organic Search" is the lowest converting lead group that actually has a high count of contacts over the last 90 days to run this test campaign (929 contacts total, with only 205 converting into customers).
If your site numbers hold similar for the next 90 days, you can expect to get around 300 contacts a month who will see this coupon popup which should push sales conversions above the 22% baseline.
This is the kind of math considerations you've got to take to your data when running "marketing experiments" like this popup campaign, and where possible it's best to view all campaigns as an "experiment" that you can test quickly to see if it starts to make a difference before over-investing. It's generally more effective to launch quickly and then make meaningful adjustments in a version 2, version 3, etc.
As you can see in this article outline, launching an email series is an optional part of running this popup campaign. Before committing to writing email content, you first want to measure the conversion of whether people show interest in your %-off coupon offer, and before rolling this offer out to all your site visitors you just want to focus on improving the sales conversion rate for your weakest lead source.
By breaking your conversion improvements down into smaller, more targetable segments you can measure what works and make adjustments before expanding your efforts on the campaign.
Write Your Offer and Coupon Code
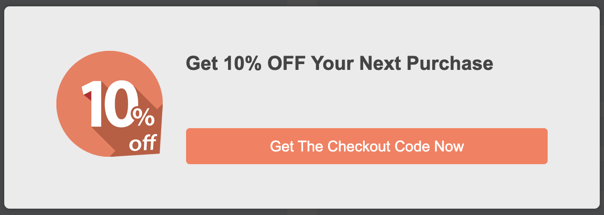
Offering "10% or 15% off your next order" is a popular discount offer in a popup:
Identify a coupon amount you'd be willing to spend to close sales on these customers who are least likely of your leads list to buy. From your Part 3 Ecom Report, you can look at stats like the average lifetime value, repeat purchase rate, length of customer relationship, and lifetime discounts in order to assess the long-term viability of closing sales on this customer source to see what acquiring this customer is typically worth.
Looking at the average of Unific's Total Value of Discounts compared with Total Value of Orders can be particularly valuable in this exercise to see if this customer base has a precedent of a certain discount amount in their lifetime purchases.
You can calculate "Total Value of Discounts / (Total Value of Orders + Total Value of Discounts)" to see an average discount percentage.
We populate Total Value of Discounts with '0' for those who have never used a discount, which will skew the average. (We populate a negative number for discounted values.) So if you see that customers are typically buying without a discount then recognize that you're "spending your marketing budget" to run this promotion which, again, may still be worth it to close sales on this lower-converting lead segment.
If you want to see a discount average ONLY on those who buy with discounts you can add a "Filter" to the Report and add "Total Value of Discounts is less than 0":

In the example above, the "Organic Search" average Total Value of Orders is $203.47 and the average Total Value of Discounts is -$20.
$203.47 is the net value, so $223.47 before discounts. $20 is an 8.9% discount on $223.47.
Therefore, for this "Organic Search" segment you shouldn't need to give a 15% discount to close a sale. Those who are willing to buy with discounts have demonstrated that a 8.9% discount is compelling so rounding up to a standard 10% discount is all that your business should need to close sales.
This is how you use your existing data to inform your discount offers!
To make things simple on the customer you'll want to deliver the coupon code in the thank you message of the popup, that way they can shop, immediately, using the code. Just allow them to close the popup so they can keep shopping on their current page.
Here's HubSpot's Knowledge Base article on setting up a popup.
Here's the general steps when creating the popup form:
- Create your fixed %/$-off coupon in your shopping cart with no expiration and copy it for this popup (it's not worth trying to generate individual coupon codes for this first version!)
- Select "Pop-up Form"
- Select "Pop-up Box"
- Complete the "Callout" tab including the headline, image that captures the excitement of the % off, and button text
- A headline like "Get 10% Off Your Next Purchase" makes the offer clear,
- A sub-line like "We'll also send our monthly promotion newsletters (unsubscribe anytime)" sets proper expectations for email followup
- Button text like "Get the Checkout Code Now" creates urgency and communicates that they don't have to wait)
- In the "Form" tab I'd recommend leaving it at Email (every extra field reduces conversions, so I'd skip even asking for First Name. If you do want to add a valuable business-specific dropdown like "Who is this purchase for?", or "What are you going to make with this?", or "Industry", etc, then you'd better double your discount offer to combat the decrease in conversions. I'd truly recommend just sticking to Email for version 1)
- In the "Thank You" tab you state the coupon code in big text and tell them they can use it now. I'd leave off the button option so you aren't directing them to a different page and they can continue on the page they're on now
- In the "Follow Up" tab go ahead and create a very simple email so you're following up with them on a 2nd channel in case they don't finish checkout, and make sure this email is in a HubSpot Campaign for tracking (believe it or not, I've seen that conversion rates after filling out a coupon offer can still be around only 30-40% because a lot of people grab the coupon "just in case", so an email is a critical reminder)
- Use a Subject line like "Your code you signed up for"
- Use Body copy that is the same as what was on the popup
- Put a Button in the email "Shop Now" that sends them to your main product page (not your home page, which is a common mistake, but the page where they can browse your actual products)
- In the "Triggers" tab leave "Website URL" and "Visitor information and behavior (Optional)" alone for now (I'll cover that in the next section) and go to the "Triggers" section at the bottom and select all 3 options (per HubSpot's documentation when multiple options are selected form will appear according to whichever trigger condition is met first)
- On 50% scroll: the form will appear when the visitor has scrolled halfway down the page.
- On exit intent (pop-up box only): This only works for Desktop browsers, but the form will appear when the visitor moves their cursor to the top bar of the browser window.
- After elapsed time: the form will appear after the specified amount of seconds, and I'd set this to a minimum of 15 seconds to not be annoying
- In the "Options" tab uncheck "Turn off pop-up form on small screen sizes" as long as you can test later that your popup fits on mobile (Ecommerce on mobile accounts for 34% of sales so you don't want to exclude these shoppers) and leave "Show dismissed pop-up form again after" to 2 weeks
- Review the Mobile, Desktop, and Tablet versions of the popup in the "Preview" tab and make any adjustments needed to your copy length or image size to make sure it looks great on all device types.
- Go back to "All Forms" in the top left because we'll refine the "Targeting" for "Organic Search" (or whomever you're targeting) in the next section
Target Your HubSpot Popup
This is where you enter the "Targeting" section of the popup to make sure it's only going to a specific source of browsers. This is the most complicated step so I'm giving it its own section.
In this example, we're going to target "Organic Search".
Here's HubSpot's article for understanding how they determine your traffic sources, and it's a complicated, ordered hierarchy of URL Query Parameters and Referring Sites that make up the data.
"Organic Search" is #10 in HubSpot priority list, so here's what we need to do for targeting "Organic Search":
- Exclude "Social Media" UTM parameters
- Exclude "Email Marketing" UTM parameters
- Exclude "Paid Social" UTM parameters
- Exclude "Paid Search" UTM parameters
- Exclude "Social media" referring domains
- Include a search engine as a referring domain
Under the "Targeting" tab, here's what you need filled out in "Website URL" to exclude non-"Organic Search":
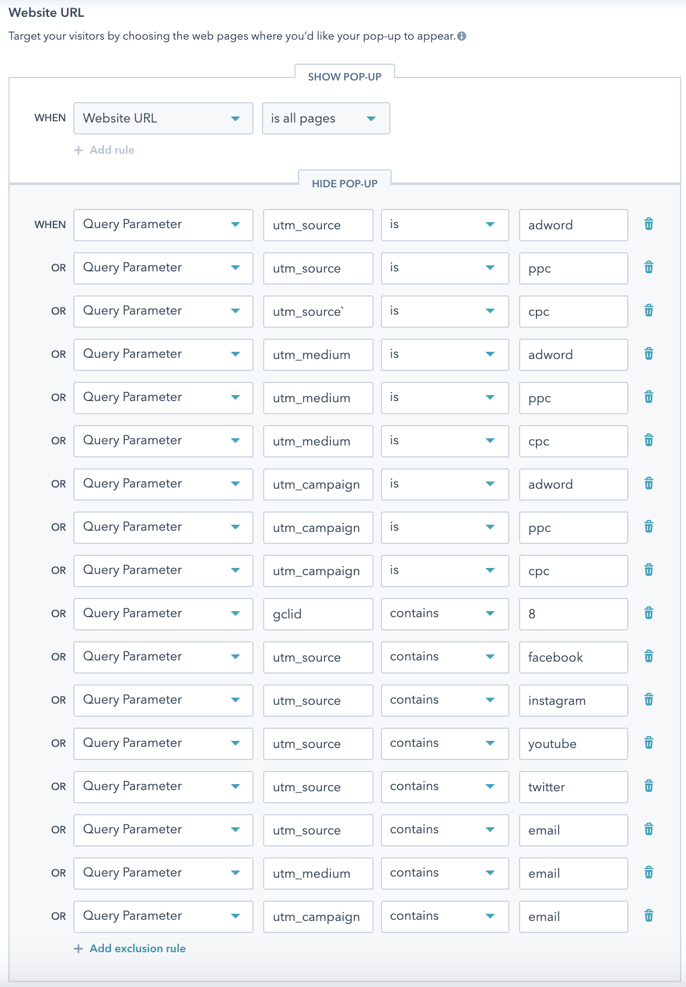
I've selected "+ Add exclusion rule" for all of these to hide the popup in these scenarios. Again, the rationale around each of these criteria is contained in this HubSpot article.
Here's the full text list of "Query Parameter" exclusion rules from that screenshot you can copy/paste:
- utm_source IS adword
- utm_source IS ppc
- utm_source IS cpc
- utm_medium IS adword
- utm_medium IS ppc
- utm_medium IS cpc
- utm_campaign IS adword
- utm_campaign IS ppc
- utm_campaign IS cpc
- gclid CONTAINS 8
- utm_source CONTAINS facebook
- utm_source CONTAINS instagram
- utm_source CONTAINS youtube
- utm_source CONTAINS twitter
- utm_source CONTAINS email
- utm_medium CONTAINS email
- utm_campaign CONTAINS email
The second section under the "Targeting" tab, "Visitor information and behavior (Optional)", looks at other browsing data and dictates which parameters will show the popup:
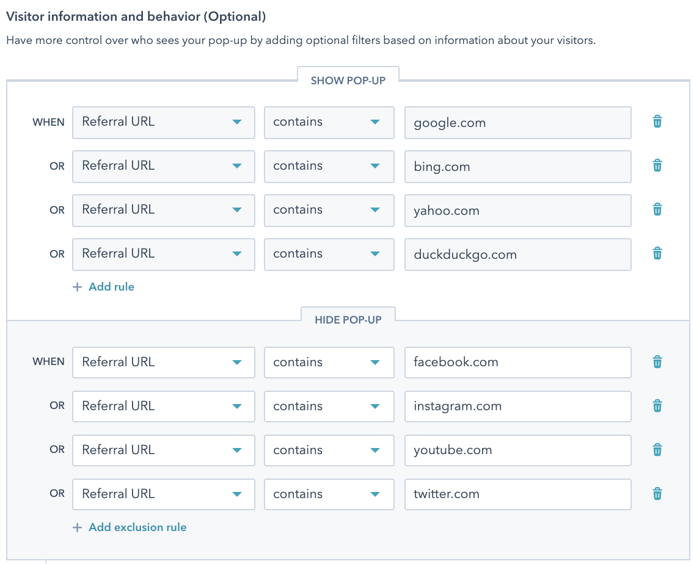
Here's the full text list of "Referral URL" inclusion/exclusion rules from that screenshot you can copy/paste:
Show Pop-Up (Inclusion rules):
- CONTAINS google.com
- CONTAINS bing.com
- CONTAINS yahoo.com
- CONTAINS duckduckgo.com
Hide Pop-Up (exclusion rules):
- CONTAINS facebook.com
- CONTAINS instagram.com
- CONTAINS youtube.com
- CONTAINS twitter.com
I've chosen the most popular search engine and social media sites for inclusion and exclusion, but you can customize these. Maybe you get traffic from LinkedIn, for example, or maybe you get international traffic where you should just end the name with the "." rather than ".com" to accommodate other domains.
Combined with the previous "Website URL" section this will make sure the popup only appears for this "Organic Search" target.
If you're targeting a different segment like "Paid Search" then you will need to assemble different criteria according to HubSpot's traffic source priority list.
I hope that HubSpot can make this kind of targeting easier in the future and you could target each source with a simple dropdown, but in the meantime this detailed work will get you the targeting you need!
Monitor Campaign Performance
In the "Performance" view of the popup, you'll be able to see views vs submissions. I like to be able to target at least a 3% signup rate. If you can get a 5% signup rate then that would be a great start!
And to compare this data to actual sales conversions, you can use the "Form Submission" version of the Pre-Sales Dashboard Report in Part 3 to see how many of these form signups are correlated with sales conversions, repeat purchases, and lifetime value!
If you're debating adding extra fields beyond just "Email" you can always monitor the drop-off from "Form Views" to "Submissions":
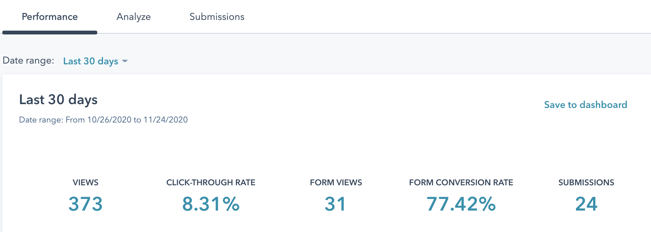
A 75% conversion rate or above would be normal for those 25% who decide on the 2nd panel that they don't want to give over their email.
But if you decide to add more fields then you can monitor this ratio to see if an increased drop-off % is still getting you qualified leads that convert to sales, or if those extra fields are unnecessarily impacting your pool of leads.
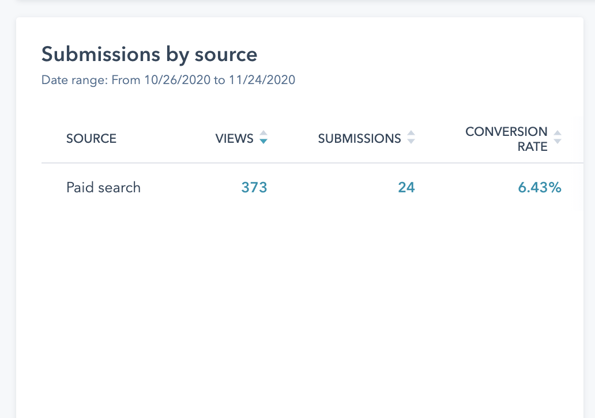
Finally, to make sure it's working as needed and targeting the right site visitors , you can monitor the "Submissions by source" section of the popup's "Performance" tab to make sure you're only acquiring leads from the intended traffic source.
This example popup is using "Paid search" as the target:
The one major thing the HubSpot popup tool is missing that I wish they'd add is "number of page views" because I'd prefer the option to show a popup only to visitors once they are on page 2 or 3 of their browsing session before interrupting their activity with a popup.
The closest HubSpot gets to this is adding "Session Count > 1" under the "Visitor information and behavior (Optional)" but this would exclude the popup from browsers who were on their first session.
If waiting for a specific page view is important to you then you'd need to upgrade to a dedicated, paid popup tool like Justuno, but I'd highly recommend launching this promotion using HubSpot's built in functionality for your first version.
(Later) Launch a Followup Email Series
As stated, launch this popup before deciding whether to invest into writing 2-3 additional followup emails. See that the popup results in an increase in captured leads from that traffic source, then if the sales conversion rate still isn't increasing along with the lead conversions, THEN create followup emails to help close the sale.
As stated earlier, I've commonly seen that conversion rates after filling out a coupon offer can still be around only 30-40% because a lot of people grab the coupon "just in case", or just get distracted and remind themselves to buy later, but never do.
The initial "Follow Up" email from the Popup form is a critical first step, but you can invest into creating additional 2-3 emails delivered via a Marketing Workflow would be a good version 2 if this popup is producing leads that aren't converting into sales.
As far as deciding when or how often to follow up with these leads, you can use the custom "Time from Lead to Customer" property to determine your followup timeline, and even the cutoff point where you might want to increase the coupon offer if they don't buy.
If you do commit to sending follow up emails in a Workflow (triggered via the Popup form submission), I would also remove the "Follow Up" email from the popup and put that Email 1 as the first step in the workflow, instead.
As helpful as this seems to have the 1st email sent by the popup and emails 2-3+ in the workflow, I've found that having some emails triggered off the "follow up" form feature and others triggers off of workflows leads to visibility issues in managing your campaign.
If you commit to using a Workflow, just put all of your follow up emails in one place in the Workflow. And of course, make sure that ALL emails you send are put into a HubSpot Campaign.
Targeting Your Lead Acquisition Offers
I hope this guide has been a helpful to launch a HubSpot coupon popup to a targeted section of your website traffic.
If you're working to stay away from discounts, or you already have some existing assets you can leverage (like downloadable PDFs, a video series, sales demo, or site contests) then you can present these valuable next-steps to your site visitors.
Even if they aren't ready to buy yet, putting them in contact with you using valuable content is the first step for building trust to close that sale!
Get a Free Customer Journey Analysis!
Identify actionable differences in your Ecommerce customer behavior to focus your marketing efforts.

