
Setting up an automated browse abandonment campaign in HubSpot can effectively augment your retargeting or conversion strategies for your Magento 2 store. In this article we'll look at the mechanics of setting up a very basic workflow to automate sending these emails.
Pre-requisites for setting up your campaign
Before we can jump into HubSpot and start building your workflow, there are a few steps you ensure you've taken:
- Install the HubSpot tracking code to your website/online storefront - you probably already crossed this one off the list, but it's a must have to be able to trigger workflows based on website visits.
- Integrate your Magento 2 store with HubSpot - you'll need a way to pass cart data including whether a shopper started a checkout, abandoned a cart or completed an order else you run the risk of sending browse abandonment campaigns to someone who eventually purchased. If you still need to do this step, you can connect your Magento 2 store to HubSpot with Unific.
- Know the URL paths for your product catalog - we'll be targeting shoppers by the pages they have visited, so copy/pasting links into a document you can keep open while you work may be helpful. Keep in mind many Magento 2 stores have their products under a folder such as https://youronlinestore.com/shop/
- Build your emails and save them for automation - you'll need at least one email to send to any shopper who enters the workflow, we recommend sending 2-3 in your workflow.
Setting up your workflow
If you are not familiar with how to build workflows in HubSpot, I suggest reading this article before moving on to the steps below.
1) Navigate to Automation > Workflows and select "Create workflow"
2) Click the "Start from scratch" tab at the top of the left column if not already selected, then choose "Contact-based." Select "Start from scratch" from the type column and be sure to rename your campaign in the top right banner bar.

3) Now that you are in the workflow builder screen, you'll start by clicking "Set enrollment triggers" to define the criteria for whom should enter the workflow and the conditions by which the steps following will be executed.
4) On the list that opened in the right column, select "Page views"
5) Select "Contact has viewed at least one URL containing" and then enter the URL or URLs that define where your product pages are stored. For many stores this will be in a folder like /shop, /products, or /collections. Below this section you'll see "Refine filter condition." Select the drop-down for "Refine by date" and set this to "is more than 1 day ago." Hit "Apply filter" to save your changes.
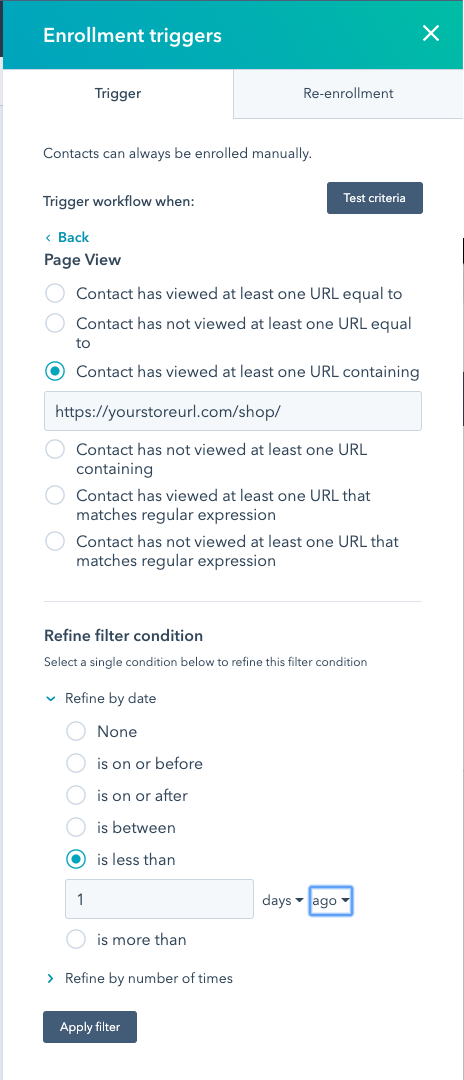
6) Next, select the "And" button that is outside of the box containing the rule you just saved. Select "Contact properties" from the list and search for the Current Abandoned Cart property. Set this field equal to "is none of Yes" and hit "Apply filter." This will ensure shoppers who place products into a cart are suppressed from entering this workflow. (Note, if you are using an integration not provided by Unific, this field name may differ. Check with your vendor to confirm the appropriate field to use.)
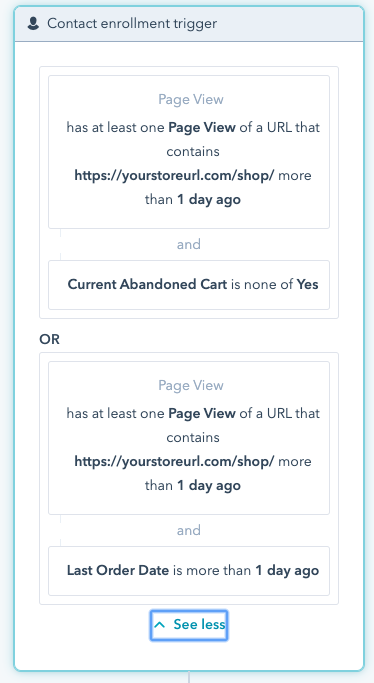
7) We'll also want to prevent anyone who has purchased since they visited your site from entering this workflow. To do this easily, click "Clone" above the rule you just created. You'll note that the rule you just created is now duplicated below. Navigate there and hover over the "Current Abandoned Cart" item and hit the trash can symbol to delete this record. Then hit the "And" button as you did before, select "Contact properties" and search for the field "Last Order Date." Set the rule for this field to be "is more than 1 day ago." Hit "Apply filter" to save your updates.
Also, don't worry about Re-enrollment for now, we'll address that later.
Your contact enrollment triggers are now set and should look like this:
8) Click the plus (+) sign below the contact enrollment trigger box and select "Send email" under External Communication in the window that opens to the right. Search for the browse abandonment email you have already created, select it and hit "Save."
9) If you are going to send additional emails you'll again click on the plus (+) sign and this time select "Delay" under Workflow. Set the delay to your desired length (it may be easiest to start with a 1 day delay) and hit "Save." Then repeat the process in step 8 to add another browse abandonment email to the workflow. (You can continue this for as many emails as you'd like to include.)
10) You can use the Test button in the upper right corner to have the workflow execute against a specific contact and send you the emails it would deliver to ensure everything is working as designed.
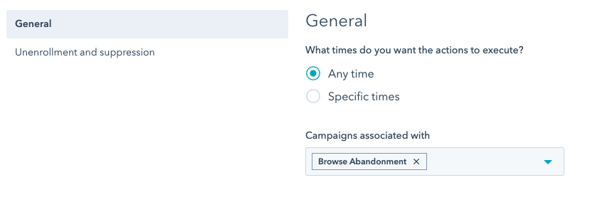
11) Next, click "Settings" in the bar below the workflow name. Here we'll make a couple updates to finalize your workflow. Under General, you can determine if you want your workflow to send emails at any time of the day, or between specific hours. If you use HubSpot Campaigns to track the success of multiple coordinated assets (like emails, social media posts and workflows) you can select that here.
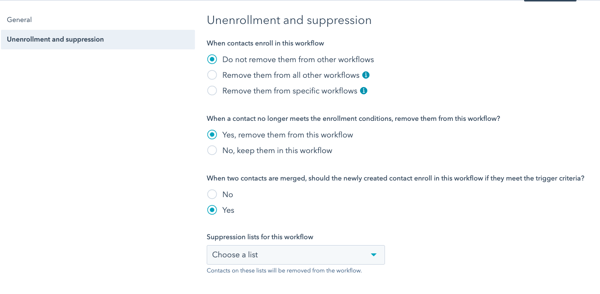
12) Now click "Unenrollment and suppression" from the left column. Here you can specify what happens when a contact enters this workflow. The most important setting here is to select "Yes, remove them from this workflow" under the question about contacts no longer meeting enrollment conditions. This will ensure contacts who comeback and start a checkout or purchase are removed from the workflow.
13) When you are ready to move to the next step and turn your workflow on, click the "Review" button in the top right corner of the page. You'll be taken to a checklist page that includes all of the criteria and actions that you've set up so far. You can go back and edit any of these choices from here as well.
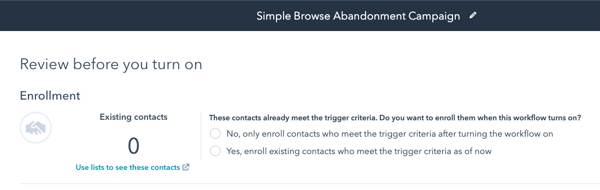
You do need to make a decision before turning your workflow on at this point. If the total under "Existing contacts" is greater than zero, you can choose to have them automatically enroll in the campaign from the start.
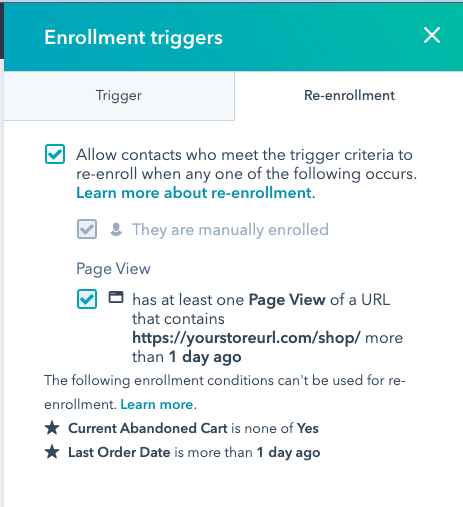
14) We purposefully skipped defining re-enrollment criteria earlier and will address it here. Given that a customer could come back to your Magento 2 store and browse again, you want to be able to re-enroll them into this campaign. To do this, click Edit next to the Re-enrollment line and check the first box and the box below Page View. It will look like this:
15) Ok, you've made it this far and now it's go time! Make sure you've reviewed all the elements of your workflow thoroughly, and then hit the "Turn on" button on the top right corner. While it feels like fireworks should shoot off somewhere in the distance, simply treat yourself to a hearty fist-pump and get ready to track your new customers!
Ready to get more sophisticated?
As mentioned this is a very simplified automated browse abandonment campaign for your Magento 2 store in HubSpot. If you are a seasoned marketer and know your way around HubSpot, you can certainly get more adventurous. You can set up similar campaigns that only enroll contacts that visit specific pages on your site, or view a certain number of pages, or visit a certain number of times. You can also have a number of different email templates with different products featured. The possibilities are numerous.
If you have questions about how to build out more sophisticated workflows for your ecommerce store, want to learn more about Unific's Magento 2 to HubSpot integration or how HubSpot can help ecommerce companies grow sales ... just let us know!
You can connect with us through our chat portal on this page, or schedule time to meet with us using the meeting booking tool below.